Introduction
Concept
What is a Tree?
A “tree” is a data structure, much like a table or a list. A tree sorts information hierarchically into boxes and sub-boxes and sub-sub-boxes.
If you want to organise your work tasks you could sort them into work packages, that are part of projects, that are part of products. If you plan a larger project, you can sort all tasks by responsible persons, who are part of teams, that are part of departments, that are part of branches. You can also make a time plan, where a year consists of quarters, that consist of weeks, that contain a number of tasks. You can have an address book where you have a hierarchy of friends / colleagues / aquaintances, or you can sort knowledge about animals into kingdom / class / family / species.
The nice thing about trees is that you can define mathematical functions on them. Planned hours can be summed up per work package and project, or per person and team, or per week and month. A mean priority can be shown per work package and project.
The concept of hierarchical categorisation can be applied to all sorts of data and will feel a lot more natural and easier to use than organising the same data in spread sheets.
What are linked Trees?
The core concept of TreeTime are linked trees. Linked trees are separate trees that share the same data. One piece of information (a node) can be in several trees at the same time, but in different place of the tree. As a single tree is a way of sorting information, different linked trees sort the same data in different ways.
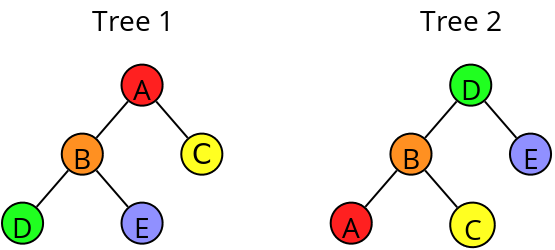
In Tree 1, Node E is right at the bottom, as a child of B and a grandchild of A. In Tree 2 it is a child of D.
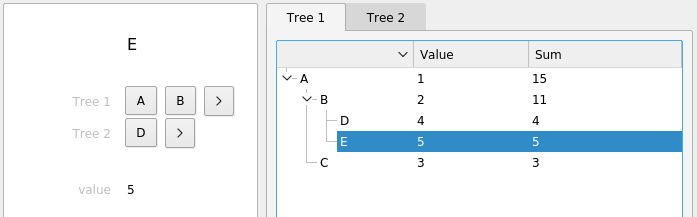
In TreeTime, a node or item can hold different information like text, numbers, dates, internet links. These are saved in the item’s fields.
Here we have a field we call “value”. Each node in all trees has a value field that can hold a number (like a cell in a spread sheet). The node A has the value=1, B=2, etc. In addition we have a field we call “Sum”. Its content is calculated automatically, summing up the item’s own value plus the values of all children. In TreeTime, looking at item E and Tree 1 this looks like this:
Clicking on the other tab shows the second tree while the same items stays selected:
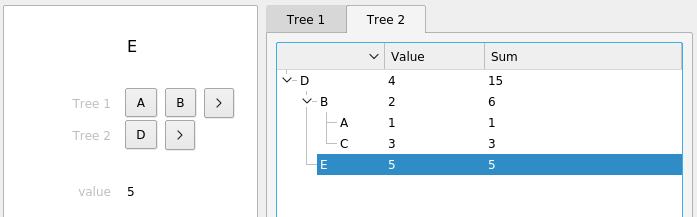
Note how the values are summed up the branches. Apart from sums, TreeTime also offers means, ratios, or differences, using different combinations of parent, child, or sibling fields.
Linked trees are a natural and powerful way to structure data. If you, for instance, organise information about animals, you might want to see the animal’s taxonomy (kingdom/class/family/species), but also their habitat (continent/country/area), and switch between both views. If you organise tasks, you could switch between a year/quarter/week/day breakdown, a company/department/team/person tree, and a product/project/package/task overview.
In TreeTime, the structure of your data (whether you store priority, hours, and a description for a task, or expected life span, habitat and number of legs for an animal), the trees themselves, and the calculated values within the trees are completely user defined. Data is stored in text files, changes are saved on the fly, and when opening TreeTime, the software is automatically connected to the last used file.
Basic Use
Start the software (see ‘Execute’ from the section [Installation](#id-installation)). In the main dialog, go to “File” / “New from Template”, select “Simple-Task-List.trt” and in the next dialog give a file name for the new file. An example file with a simple project task list structure will open.
The GUI consists of three parts: - A button box on the left. Execute tree structure operations from here. - An editing grid in the middle, showing the contents of the selected data item. Edit single data items here. - A tab view with tress spanning the center-right. View and analyse your data here.
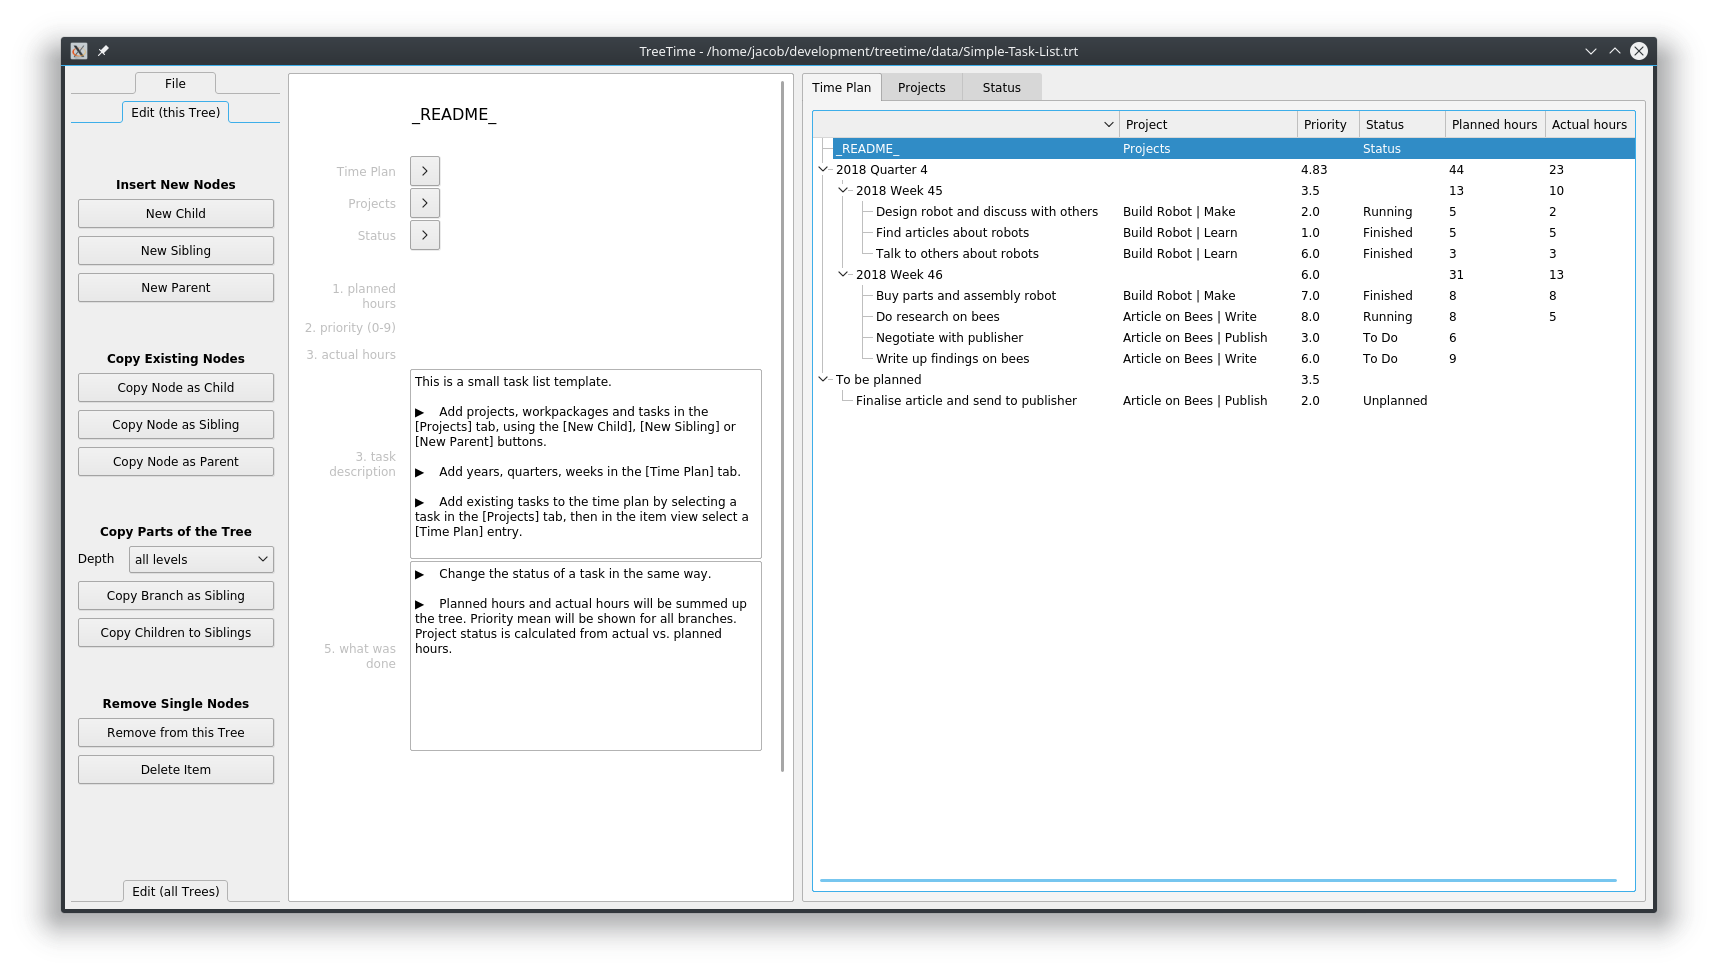
Access each single tree by clicking a tab on the main tree-view widget (the picture above shows the tree Time Plan, the picture below the tree Projects).
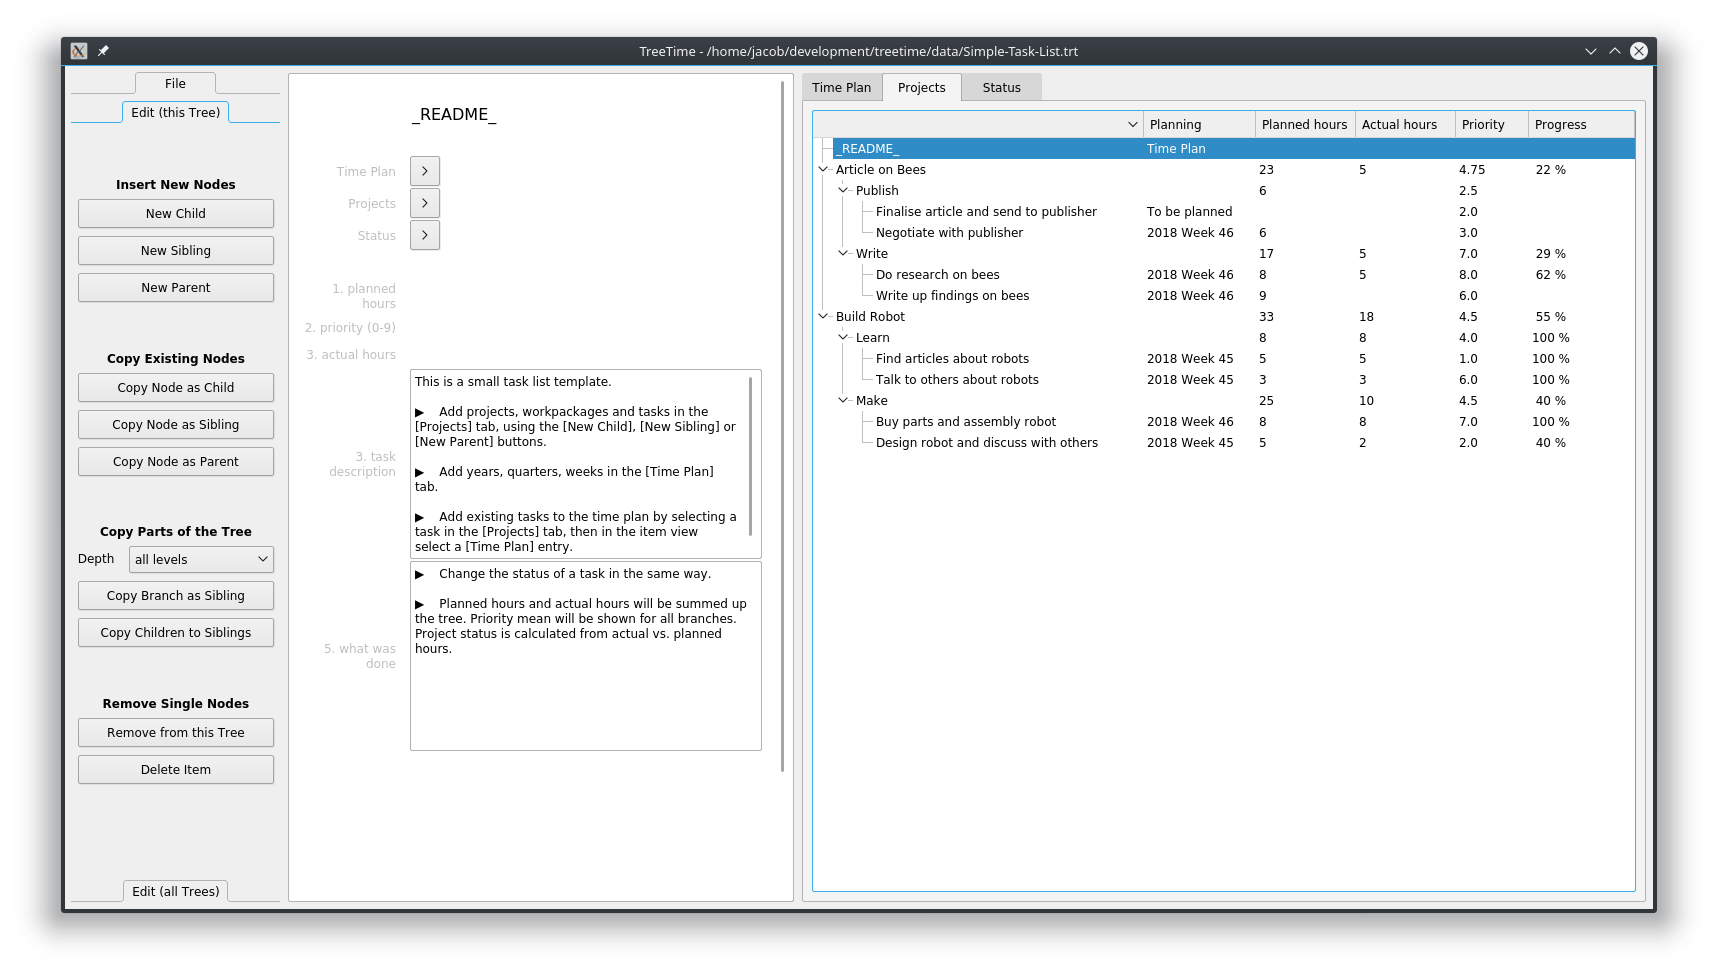
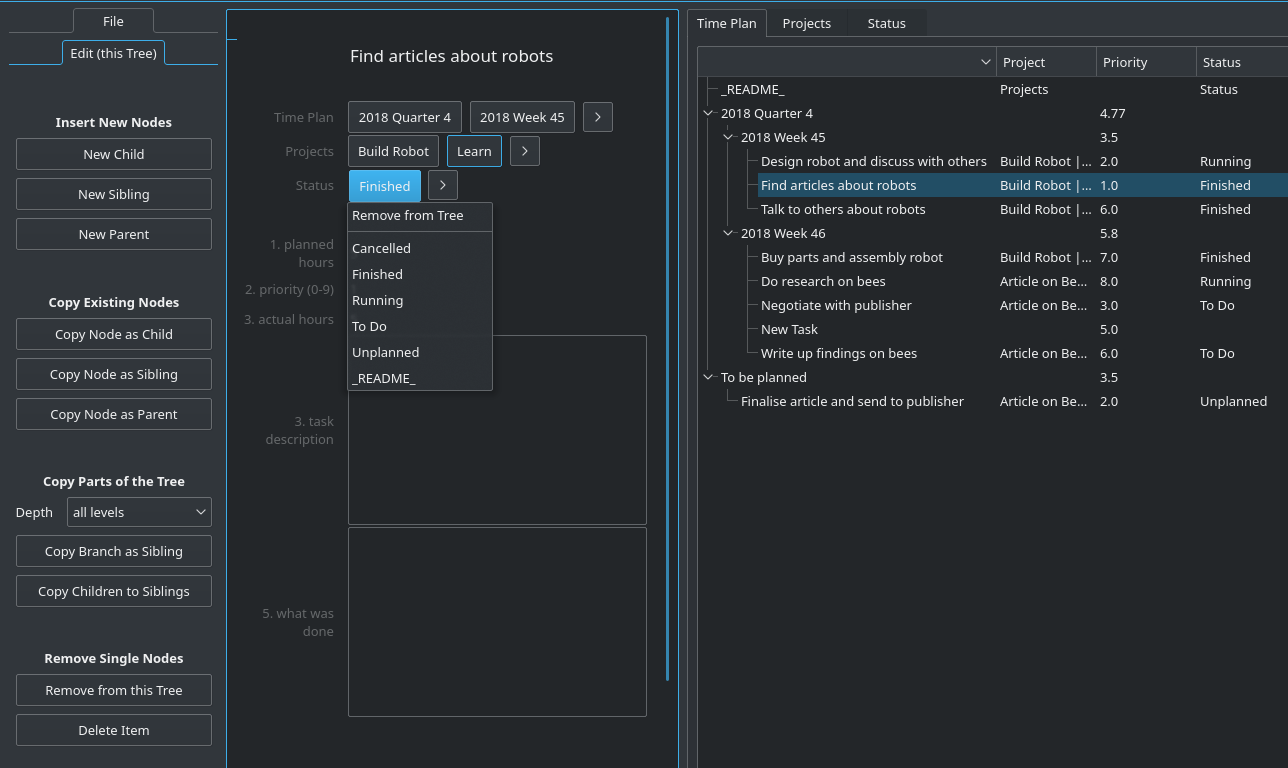
Branches and children can be sorted, branches can be folded and unfolded. Data content is shown via analytic fields that are defined per tree. In the example project you will see a sum, a percentage, and text display.
Add, move and remove single nodes and complete branches by using the buttons on the left. Change the name of a node by selecting the node and editing the name in the top of the edit grid in the middle. Change all other values (numbers or text) by clicking into the field and start typing.
The parents of an item are listed underneath the item name. Each tree has a separate line. Change the position of a node within a tree by clicking on any of the parent buttons.
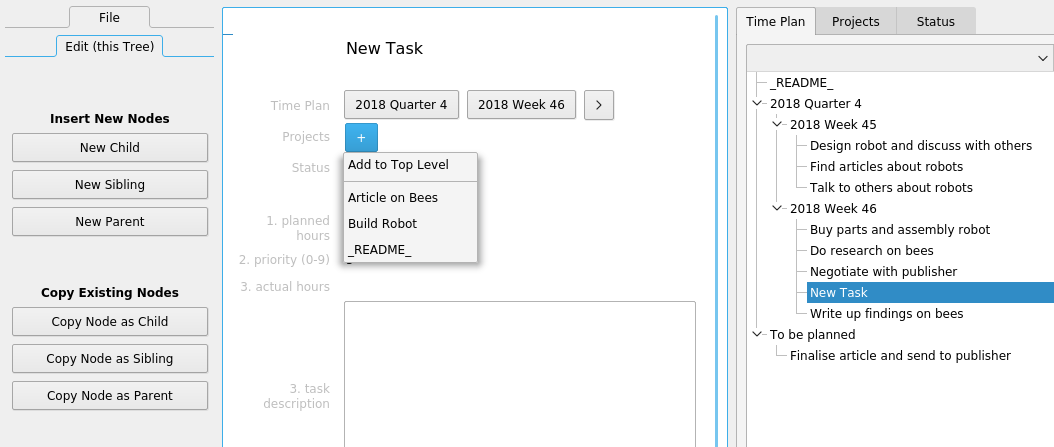
In this example a new node in the tree Time Plan has just been created, and is now added to the tree Projects.
TreeTime lets you select different themes and will try to use the default colours that are defined with your operating system.
Data Files
The data in TreeTime is stored in a plain text file, marked with a ‘trt’ file ending (‘trt’ for ‘TreeTime’).
The button ‘New empty File’ will start an (almost) empty ‘trt’ file. More trees, data fields, or tree fields can be added using the meta-structure editor.
The button ‘Load File’ will open an existing ‘trt’ file. After this, all changes are written to that file. There is no ‘Save’ button, changes are written to the file immediately.
The button ‘New From Template’ opens an existing data file, creates a copy, and saves this copy. A data file can be created by copying the currently open file. All write operations will be performed on that copy. This is to create a new file from a basically empty ‘trt’ file that has a pre-defined data structure.
A data file can be created by saving the currently open file to a copy. The button ‘Save As’ saves the current state. All write operations will be on the new file.
Installation
Using pre-compiled Binaries
Windows, Linux: Go to [codeberg.org/jkanev/treetime/releases/tag/2025.3](https://codeberg.org/jkanev/treetime/releases/tag/2025.3) and download a zipped package for Windows 10, 64 bit, or for Linux 64 bit from there. Unzip it into your program directory and run TreeTime or TreeTime.exe from the new folder. Unzip the data package too. Add the program folder to your path.
Executable bundles have been created with pyinstaller ([www.pyinstaller.org](http://www.pyinstaller.org)).
Mac: Mac users please use the Python code (see below). There is no executable for Mac. (If anybody can help building an executable for other platforms I’d be delighted.)
Using a PyPi package in Python
If you don’t have it yet, install python3
- Install PyQt6 – on an elevated command prompt (Windows), or on the standard command line (Mac, Linux), type:
pip install PyQt6
- Install TreeTime – on an elevated command prompt (Windows), or on the standard command line (Mac, Linux), type:
pip install treetime
Using script code with Python
If you don’t have it yet, install python3
Install PyQt6 – on an elevated command prompt (Windows), or on the standard command line (Mac, Linux), type: pip install PyQt6
Download this project from GitHub as a zip file (https://github.com/jkanev/treetime/archive/master.zip) and unzip
- Install TreeTime: in the command line, cd into the main directory, then type:
- Linux:
python3 setup.py build
sudo python3 setup.py install
- Windows:
py setup.py build
py setup.py install
Execute
Windows: Hit the Windows key and type “TreeTime”, then click the “run command treetime” that comes up.
Linux, Mac: On the command line, type “TreeTime”. You can also start this any other way your operating system supports. Plus, there’s a .desktop file (for KDE and Gnome) in the data directory to create desktop or menu link.